
Esta página aún no está traducida y se muestra en inglés.
Printing a drawing
Choose File > Print (Ctrl+P). TraceDraw builds the sheets and sends them to the printer you choose, or opens a PDF of them in your system's viewer, where you choose the printer and print. In the browser version, the PDF is downloaded.
Printing to a printer runs in the background: the window keeps working, the status bar says "Printing on ..." and then how the print went.
The tabs are General, Color, Composite, Layout, Prepress, PostScript and Issues. Under them, Print preview opens the preview with these settings, and Apply keeps them for the next time.
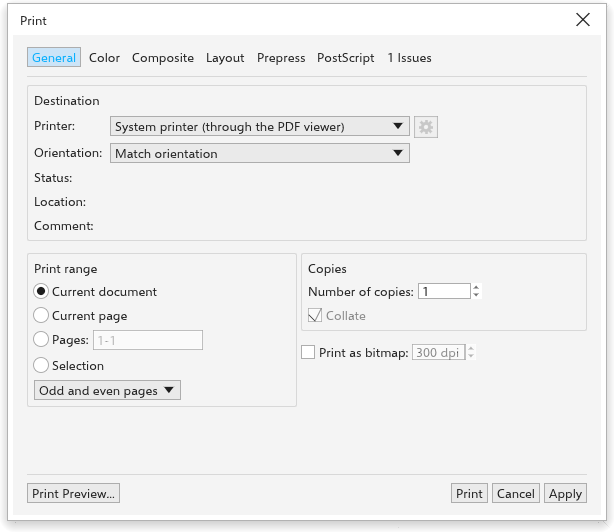
General
- Destination: one of your system's printers, the system's PDF viewer (which then chooses the printer), a PDF file or a PostScript file. The gear button beside a printer opens its own settings, and the status, location and comment of the printer show under it. The dialog starts on the printer you printed to last.
- Orientation: match the layout, portrait or landscape.
- Sheet: the page's own size, the standard paper sizes, or a custom size you can save under a name.
- Print range: the whole document, the current page, a list of pages (such as
1-3, 5, 8-), or the selected objects; and all, odd or even pages of the document or of the list, for printing on both sides by hand. The selected objects print alone (nothing else of the page, its master layers or its background), on a page the size of the area they cover: with the sheet set to the page's size the paper is that area, on a fixed sheet they are centred at their size (smaller only when they do not fit, unless Keep page size is ticked), and the layouts repeat that area. - Copies, collated as whole sets or not.
- Print as bitmap: each sheet becomes one picture at the resolution you give.
Color
- Composite prints all colors on each sheet; Separations prints one gray page per ink (cyan, magenta, yellow, black, then each spot ink). In Print Preview you can untick inks under Print separations; only the ticked inks print.
- Convert spot colors to CMYK prints spot inks as their CMYK mix.
Composite
- Print text in black.
- Always overprint black: full black fills and outlines print over the colors beneath.
Layout
- As in document, Fit to page, or Scale to a percentage. Fit to page scales the page to fill the paper inside its margins, larger or smaller; what you put partly off the page stays cut at its edge, as on screen. When you print only the selection, it shrinks to fit the page.
- Bleed limit: how far beyond the page objects print (4 mm at first, or the drawing's own bleed).
- Paper margins (left, right, top, bottom, 0 at first) keep the paper's edges clear: the pages and their marks go in what is left.
- The imposition: several pages on one sheet, or a booklet, whose pages are paired for folding, with the sheet size and the gap between pages. A sketch shows the result. For the back of double-sided cards, tick Back side: the pages run right to left on the sheet, so each one prints behind its front, and the text is not mirrored. Keep page size keeps the pages at their size on a fixed sheet: they do not shrink for the marks, and the columns and rows stay as you set them (pages that do not fit run off the sheet, and a warning says so). Without it, the pages shrink to fit the columns and rows you ask for. In Print Preview, drag on the sheet to move the page information.
- Page order, with several pages on a sheet: Across, then down, Down, then across, Down, through all sheets or Cut and stack. Cut and stack numbers down the stack, for merged tickets and cards: each place on the sheet takes the next record on the next sheet, so after cutting the stacked sheets each pile is one run and the piles go on top of each other in order. 100 records 4 up print on 25 sheets, the first holding 1, 26, 51 and 76, the second 2, 27, 52 and 77.
Booklets
Choose Booklet as the imposition to print two pages on each side of a sheet, ready to fold. Printing booklets explains it step by step. The page count is rounded up to a multiple of four with blank pages at the back, and the summary under the sketch says how many pages, blanks and sheets of paper it takes. To print only some of the pages, list them in Pages first.
- Binding: Saddle stitch nests every sheet inside the one before and staples them through the fold (8 pages: 8 1, 2 7 on the outer sheet). Perfect bound folds the sheets in signatures of Sheets per signature, stacks the signatures and glues them at the spine (one sheet per signature: 4 1, 2 3, then 8 5, 6 7).
- Creep (saddle stitch): how far the pages of the innermost sheet move toward the spine, so the fore edges line up after trimming; the sheets between move in proportion, the outer one not at all.
- Gap: the space between the two pages of a spread, centred on the fold.
Prepress
- Invert and Mirror the whole sheet, for film.
- Print file information (the drawing's name or your own text, the page numbers, sheet number and date) and Print page numbers.
- Crop marks (and fold marks for booklets), Registration marks, Color bars and Densitometer scale.
PostScript and issues
With a PostScript file as the destination, the PostScript tab sets the language level (2 or 3). The Issues tab shows what the preflight check finds; see Preflight.
Apply keeps the settings for the next time; see Global options for the defaults.
Print preview
File > Print Preview, or Print preview in the Print dialog box, shows the sheets exactly as they will print, with the imposition and the marks.
- The bar at the top has Print, the sheet shown with previous and next (PgUp, PgDn), the zoom with Fit, the printer with its settings button and status, the number of copies with Collate, and Close (Esc). On a narrow window the bar takes two rows.
- The options on the left stand two to a row: the pages (all, current, a list, the selection, odd or even), fit to page or the scale, then the prepress options (separations, bleed, marks, page information, mirror, invert, transform and artwork position), then the layout with its sketch. Every change rebuilds the sheets at once. Drag the panel's edge to make it wider.
- With Print separations on, a box for each ink stands under it, side by side. All ticked shows the sheet; one alone shows its plate in gray; some show the colors those inks print together.
- Drag the dashed blue lines on the sheet to set the paper margins, and drag the sheet to move the artwork on its page (Artwork position shows the move, with Reset). Transform draws handles to stretch the artwork.
Other ways to print
- File > Send To saves a PDF to your desktop or documents folder, or attaches it to an email.
- Export as PDF writes a PDF with full control of its settings; see Publishing to PDF.