Bu sayfa henüz çevrilmedi ve İngilizce gösteriliyor.
Setting outlines
The outline is the line drawn along the edge of an object. You set its color, width, style, corners, line ends and arrowheads in the Outline section of the Properties panel.
Opening the outline settings
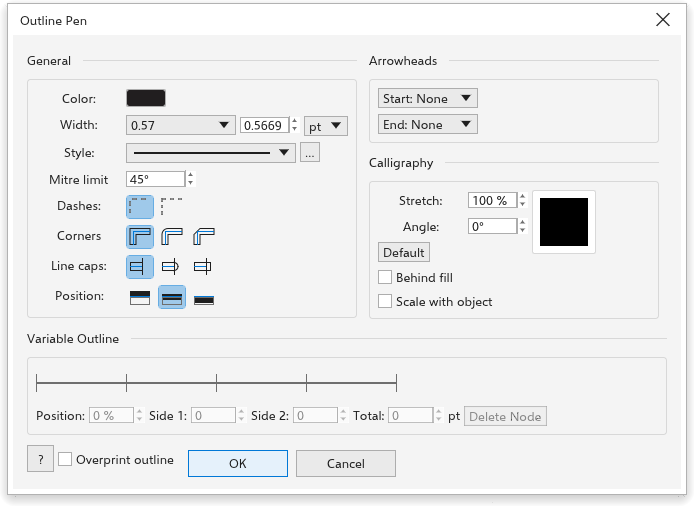
- The Outline Pen tool (F12) opens the Outline Pen dialog box with every outline setting: color, width and its unit, style, miter limit, dashes, corners, line caps, position, arrowheads, calligraphy, Behind fill, Scale with object, the variable outline's width nodes and Overprint outline. The selected objects show each change live while the dialog box is open. It opens with the width selected: type a number and press Enter. OK keeps only what you changed, on every selected object, as one undo step; Cancel or Esc puts the outlines back. With nothing selected it sets the outline of new objects. The width list offers the same round widths as the property bar, in the outline unit (0.1, 0.2, 0.25 mm and so on).
- Double-click the outline part of the status bar.
- Right-click a color of the palette to color the outline of the selection.
Outline Pen settings
- Width: 0.2 mm for new objects. Hairline draws a line one screen or printer dot wide at every zoom.
- Paint: the outline can be painted like a fill: none, uniform color, gradient, pattern, texture or mesh. See Fills. Hairlines and arrowheads keep the plain outline color.
- Caps, the ends of open lines: Butt (at first), Round or Square.
- Corners: Miter (at first), Round or Bevel. The Mitre limit (45 degrees for new outlines) bevels corners sharper than it, so a thick outline on text or narrow turns does not grow long spikes.
- Dash: Solid, Dashed, Dotted or Dash dot. The dashes grow with the width.
- Arrowheads, at the Start and the End of open lines, filled in the outline color. To make your own, draw it, select it and choose Object > Create > Arrowhead.
- The nib stretch (0.1 to 1) and nib angle make a calligraphic outline: thinner across the nib than along it, like a flat pen. In the Properties panel they sit with the Mitre limit under the Advanced header after the common settings, closed at first unless one of them is set.
- Behind fill draws the outline under the fill, so only its outer half shows.
- Scale with object: the width grows and shrinks when you resize the object.
To turn an outline into an object you can fill, choose Object > Convert Outline to Object (Ctrl+Shift+Q). Curves stay curves: the new object has about as many nodes as the path the outline was drawn along, and round ends and corners become arcs. The settings of new objects are explained in Object styles and defaults.
Outline Color
The Outline Color tool (Shift+F12) opens the Color panel to choose the outline color of the selection. See The Color panel.
Variable Outline
The Variable Outline tool, whose button sits under the brush tools in the toolbox, makes an outline thicker or thinner along its length with width nodes.
- Select an object with an outline, such as a curve, a rectangle or an ellipse. An object with no outline gets a thin one.
- Choose the Variable Outline tool.
- Drag across the outline: a width node is added where you start, and the outline reaches to the pointer on both sides. Hold Shift (or Alt) as you start dragging to change only the side the pointer is on. Shift+click picks a run of nodes and Ctrl+click adds one; a drag then changes all the picked nodes.
- Add more nodes the same way. Between nodes the width changes smoothly.
To change a node, click it and type the Left width and Right width on the property bar (left is to the left of the path's direction). Delete node or Delete removes the selected node, and Clear variable outline gives back the plain outline.