ໜ້ານີ້ຍັງບໍ່ໄດ້ແປເທື່ອ ແລະ ຖືກສະແດງເປັນພາສາອັງກິດ.
Barcodes and QR codes
TraceDraw makes barcodes for products, labels and inventory, and QR codes that phones can read. Both are made of ordinary vector shapes, so they print sharp at any size.
Making a barcode
Choose Object > Insert > Barcode to open the Barcode Wizard. It has three steps; a Sample preview under each shows the barcode as it will be made. Use Next and Back to move between steps, and Finish on the last one.
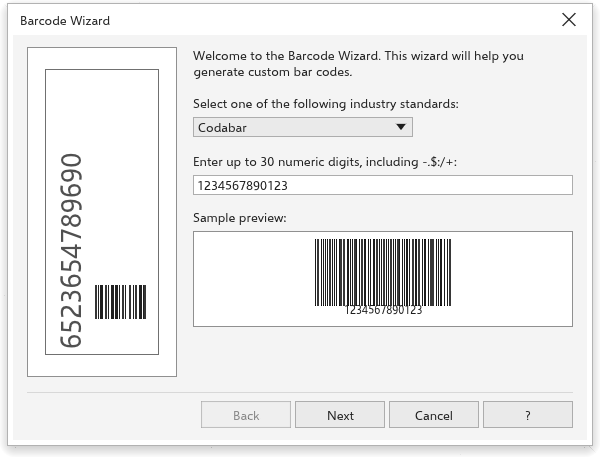
Step 1: the standard and the data
Choose one of the standards and type the data. Choosing a standard puts a sample in the field, and the wizard says what the standard accepts:
- Codabar: up to 30 digits and the signs
- $ : / . +, between start and stop characters A to D. - Code 39: capital letters, digits and
- . space $ / + %. - Code 128: any printable character.
- EAN-13, EAN-8 and UPC-A: 12, 7 or 11 digits, or one more with the check digit, optionally followed by a space and a 2- or 5-digit add-on.
- UPC-E: 6 digits, or the number system (0 or 1) and 6 digits.
- Interleaved 2 of 5: up to 40 digits.
Data the standard cannot hold keeps you on this step with a message.
With data merge records loaded, Insert Print Merge field adds a field to the data as <Name>, so that each merged record gets its own barcode. Until you merge, the barcode shows the standard's sample when the standard cannot hold the field's name.
Step 2: printer and sizes
- Printer: the resolution of the printer, 150 to 2400 dpi (300 at first). Bars are made a whole number of printer dots wide, so they print evenly.
- Units for the sizes below.
- Bar width reduction: printer dots taken off every bar to make up for ink spreading (1 at first). The barcode keeps its width.
- Magnification (scale): 100% is the standard size.
- Bar height (1 inch at first), with the resulting Symbol width: {w}.
- Wide to narrow: 2.0 to 3.0, for Codabar, Code 39 and Interleaved 2 of 5.
- Advanced adds Add the check character (Code 39 and Interleaved 2 of 5) and the Quiet zone, a white margin behind the bars in modules.
Step 3: the text
- The Font, Size (12 points at first), Weight and Alignment of the readable text.
- Options, available where the standard uses them: Center sys/check, Place text above, Show add-on text, Add-on text at bottom, Show FACT data, Show asterisks, Show quiet zone marks and Show start/stop.
- Make this bar code human readable (show text): turn it off for bars without text.
Finish places the barcode in the middle of the page as one group and selects it.
QR codes
Choose Object > Insert > QR Code. A QR code is placed in the middle of the page at once, and the Properties panel opens at its QR Code section:
- Choose the kind of content: URL, Email, Phone number, SMS, Contact (vCard), Text or Location.
- Fill in its fields, such as Address (URL), or First name, Last name, Phone number and Email address for a contact. A field applies when you leave it. Fields the kinds share are kept when you change the kind.
- Set the look: Pixel fill and Background fill (any fill), Pixel outline and Pixel size (2.5 mm at first).
- Click Validate to check that the code reads back. A green message says it does; a red one says why not, for example when the pixels are not dark enough against the background.
The QR code stays editable: move, scale or turn it as any object and change its content later. To make it plain shapes, ungroup it. Content that cannot be encoded, or too much of it, changes nothing and shows in red.