
ໜ້ານີ້ຍັງບໍ່ໄດ້ແປເທື່ອ ແລະ ຖືກສະແດງເປັນພາສາອັງກິດ.
Fills
A fill paints the inside of a closed object. TraceDraw has six kinds of fill: None, Uniform (one flat color), Gradient (colors that blend into each other), Pattern, Texture and Mesh (colors that flow between the nodes of a grid).
Ways to fill an object
- Click a color of the palette to give the selection a uniform fill.
- Press F11 for the Edit Fill dialog box (see below), or use the Fill section of the Properties panel: choose the kind of fill with the row of pictures, then its settings.
- Use the Interactive Fill tool (G) to set gradients on the object itself.
- Use the Area Fill tool to fill an area enclosed by several objects.
- Use the Mesh Fill tool (M) for a mesh fill.
With nothing selected, the fill you choose becomes the fill of new objects.
Uniform fills
A uniform fill is one color, in any color model. Choose it from the palette, the Color panel (see The Color panel) or the fill section of the Properties panel.
Gradient fills
A gradient blends two or more colors. Its settings, in the fill section of the Properties panel:
- The type: Linear (along a line), Radial (from the center out), Conical (around the center), Square (in growing squares) or Shaped (following the outline of the object, from the edge inwards).
- Gradients: ready-made gradients to start from.
- The stops: the colors and where they sit along the gradient, 2 to 64. Select a stop to change its color or position; Add stop and Remove stop add and remove stops. Import Gradient takes the colors from a
.ggrgradient file. - The angle of linear, conical and square gradients, the edge pad (how much of each end is solid color) and the center offset of radial, conical and square gradients.
- Repeat: None, Sawtooth (the colors run again from the start) or Mirror (they run back and forth), with the number of Cycles.
- Bilinear: the colors run from the first to the last and back.
- Invert colours: the colors run in reverse order.
A strip under the type shows the whole run of colors as it will be drawn.
The Edit Fill dialog box
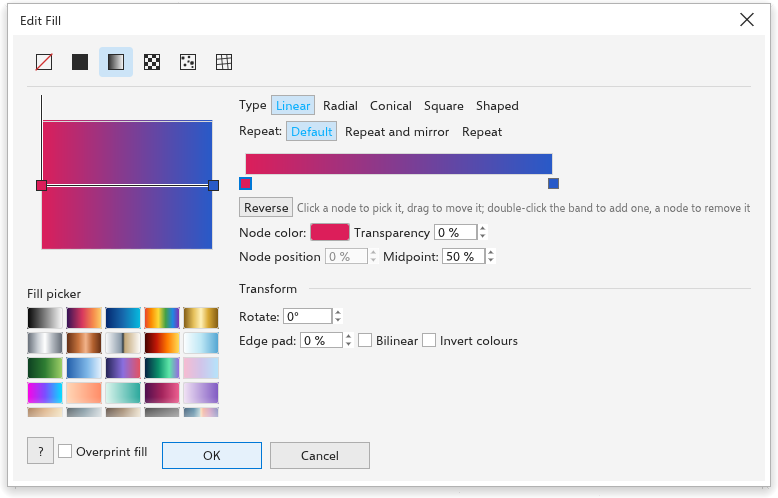
F11 opens the Edit Fill dialog box on the fill of the selection (or of new objects, with nothing selected).
- The row of pictures at the top picks the kind of fill.
- A uniform fill shows the color viewer.
- A gradient shows a preview of the fill and the Fill picker with the built-in gradients on the left. On the right: the type, how it repeats, and the band of colors with its nodes. Click a node to pick it and drag it to move it; double-click the band to add a node and a node to remove it. The picked node's color, transparency, position and Midpoint are under the band, with Reverse. Transform has the rotation, the center (for radial, conical and square gradients), the edge pad, mirror and inversion. The preview has the object's proportions and shows the start, end and skew nodes: drag them to move, turn and stretch the gradient as on the canvas (Ctrl turns in steps of 15 degrees).
- OK changes only what you changed on every selected object, with Overprint fill.
- While the dialog box is open, the selection shows the fill as you change it; Cancel or Esc puts the old fill back.
The Interactive Fill tool
The Interactive Fill tool (G) edits fills on the object.
- Choose the tool and drag across an object: the gradient starts where you press and ends where you release, keeping the colors of a gradient the object has already. Hold Ctrl to keep the angle to steps of 15 degrees. A click on an object without a gradient gives the default fill.
- Drag the nodes to change the gradient: the start node moves it, the end node sets its length and direction, and the round skew node tilts the bands (or makes a radial gradient an ellipse).
- Double-click the line between the nodes to add a color node there; double-click a color node to remove it. Drag a color node along the line, or the short bar between two nodes to move the point where their colors meet half way.
- Click a node to pick it: a small bar opens under it with the node's color (click the swatch for the color picker) and its transparency. A palette color clicked while a node is picked goes to that node, and the property bar shows the node's color, transparency and position.
- Drag a palette color onto a node to recolor it, or onto the line between the nodes to add a color there.
The property bar has the kind of fill and its settings: the color of a uniform fill; for a gradient the type, the start and end colors, the angle and the edge pad.
The Area Fill tool
The Area Fill tool fills any closed area, even one formed by several overlapping objects, by making a new object of that area. The objects around it stay as they are.
- Choose the Area Fill tool.
- Choose the fill and outline on the property bar: Specify (the color, and for the outline the width, beside it), Use default (the fill and outline of new objects; a color when that is no fill, so the area shows) or None.
- Click inside the area.
The new object goes on top of the active layer and is selected. A click on an outline, or in an area that nothing encloses, makes nothing.
Mesh fills
A mesh fill is a grid of nodes over an object, each node with its own color and transparency; the colors flow smoothly between the nodes. It suits realistic shading.
- Choose the Mesh Fill tool (M) and set the rows and columns on the property bar (2 by 2 at first, up to 50).
- Click an object. It gets a mesh in the color of its fill.
- Click a node to select it, then click a color of the palette to color it. Drag nodes to bend the flow of colors.
- Double-click inside the mesh to add a node exactly there, on a new row and column through that point; select a node and press Delete to remove its row and column.
The property bar also has Smooth color, which blends the colors more softly, the transparency of the selected node, and Clear mesh, which removes the mesh fill. Changing the rows and columns of a mesh keeps its colors.
Pattern and texture fills
- A Pattern fill repeats a tile: two colors, a vector pattern or a bitmap. See Pattern fills.
- A Texture fill is a generated, natural-looking texture: Clouds, Marble, Noise or Wood, with its colors and scale.
Several fills on one object
In the fill section of the Properties panel, Add Fill paints another fill over the object's own, starting as a copy to change. Further fills show as "Fill 2", "Fill 3" and so on, each with its own editor and a button to remove it. The outline section can add further outlines the same way.
Fills can also be painted on outlines; see Setting outlines.