
Tracing bitmaps
Tracing turns a bitmap into vector shapes that you can edit, recolor and scale without losing quality: a scanned logo, a sketch, a photo.
Automatic trace
Select a bitmap and choose Image > Trace > Automatic. It uses the preset chosen on the Bitmap Tracing page of the global options (Optimized at first, which chooses the detail for each picture: as faithful to it as it can be in the fewest nodes).
Repeat Last Trace traces the selected bitmap again as the last trace did, without the dialog box, and Open Last Trace Settings opens the dialog box with the last trace's settings. A bitmap's right-click menu has these commands too, with Centerline and Outline.
The Trace Bitmap dialog box
Image > Trace > Outline and Centerline list presets; choose one to open the trace dialog box.
- Outline fills areas of color with shapes: Line Art, Logo, Logo (Detailed), Flat Colors, Photo (Low Detail), Photo (High Detail) and Optimized.
- Centerline follows lines with open curves: Technical Drawing and Sketch.
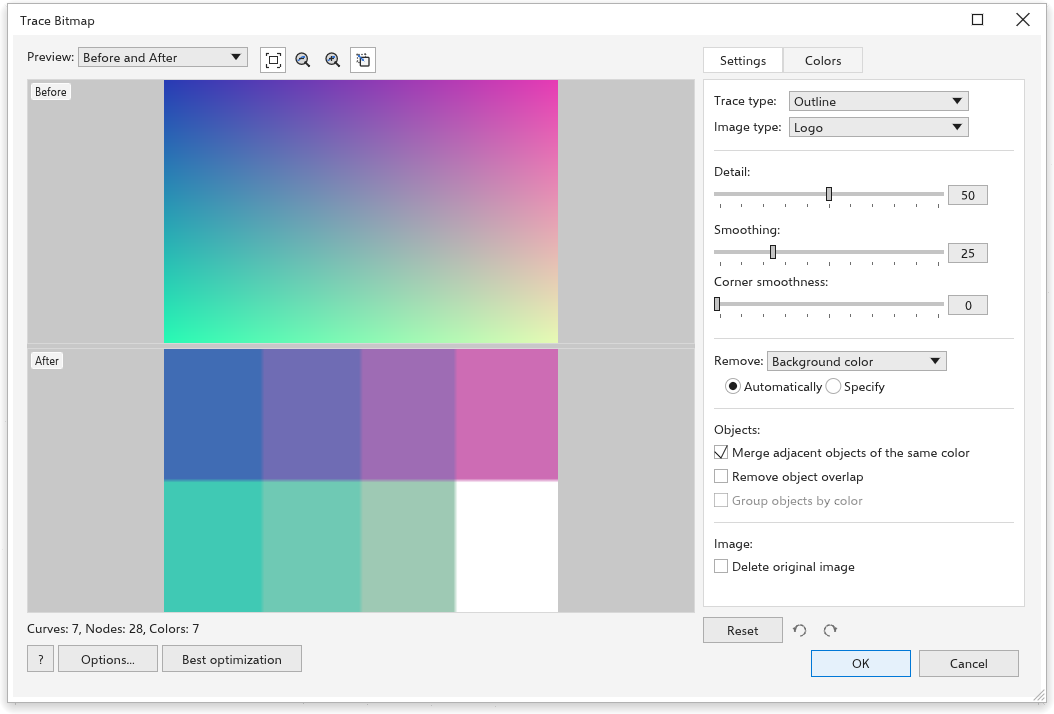
The dialog box is a window you can resize and maximize. The preview fills its left side, the settings sit in a panel at the right, and the trace is made again whenever you change a setting: there is nothing to press to see the result. Under the preview a line counts the curves, nodes and colors of the trace. Click OK to place the shapes over the bitmap, darkest first, or Cancel to leave the bitmap as it is; both sit at the bottom right of the dialog box.
The preview
The Preview list chooses what the preview shows:
- Before and After: the bitmap above and its trace below, or Before and After side by side; Before shows the bitmap alone.
- Large Preview: the trace alone, as large as the preview.
- Wireframe Overlay: the curves of the trace drawn as thin lines over the bitmap. An Overlay slider appears beside the list: it sets how strongly the bitmap shows under the lines, from 0 (the lines alone) to 100 (the bitmap as it is), 80 at first.
The buttons after the list zoom to fit, zoom out, zoom in and pan. The wheel zooms around the pointer and a drag moves the picture; both panes move together. Transparent parts show a checkerboard.
In the browser a large picture is previewed from a smaller copy, and a note in red under the preview says so: fine detail can look coarse there, but OK traces the whole picture. The desktop app shows the preview exactly.
Settings
The Settings tab holds:
- Trace type Outline or Centerline, and Image type the preset. Choosing one sets the sliders below to the values that suit that kind of picture.
- Detail (0 to 100): more detail keeps smaller areas and finer lines; less detail smooths specks and grain away. With Optimized the detail is chosen for each picture and the slider is grayed.
- Smoothing (0 to 100, 25 at first): smoother curves with fewer nodes.
- Corner smoothness (0 to 100): rounder corners.
- Remove: what to leave out of the trace. Background color removes the background where it reaches the edge of the picture, Entire color from image removes every area of that color, None traces everything. Automatically finds the background color along the picture's edge; Specify uses the color of the swatch, which you can change, or pick from the preview with the eyedropper beside it.
- Objects: Merge adjacent objects of the same color (on at first) makes one curve of every area of a color; off, each separate patch is a curve of its own. Remove object overlap keeps every shape to its own pixels, holes and all; off, a shape is drawn whole under the shapes inside it (a head under its eyes). Either way, neighbors share one curve along their border, so no gaps show and the wireframe shows each border once. Group objects by color puts the curves of each color in a group of their own; it is available when the areas of a color are not merged already.
- Delete original image: the bitmap goes when the trace is placed.
Settings that do not apply to the current trace type are grayed out: a centerline trace reads only the detail and the smoothing.
Best optimization, at the bottom left of the dialog box, tries several details on the picture, compares each trace with it, and puts the detail that draws it most faithfully in the fewest nodes into the Detail slider. It is a step you can undo. If you change the settings before it is done, its result is left out.
Colors
The Colors tab sets the Color mode (RGB, grayscale, or black and white) and the Number of colors (2 to 256), and lists the colors of the trace with the number of curves of each. Tick two or more colors and click Merge selected colors to join them into the first one; click a color's swatch to draw its curves in another color. Changing a setting that traces the picture again forgets these edits, which belonged to the previous trace.
Reset, undo and redo
Under the settings panel, Reset puts the preset's settings back, and the two arrows step backward and forward through every change made in the dialog box: each slider release, list choice, check box, color edit and Reset is one step. A change made after undoing drops the steps that were undone.
Options opens the Bitmap Tracing page of the global options, where you choose the automatic trace preset and the choices every trace starts with, and then returns to the dialog box. The Help button opens this page.