
لم تُترجم هذه الصفحة بعد وتُعرض بالإنجليزية.
Adding and editing text
Adding text
- Choose the Text tool (F8).
- For artistic text, click where the text starts and type. Press Enter to start a new line.
- For paragraph text, drag a frame, then type. The text wraps at the edges of the frame.
- Press Esc to finish. An empty text is removed.
New artistic text is 24 points, paragraph text 12 points, in the first sans-serif font found. Change the defaults by formatting with nothing selected.
To make an existing object a text frame, right-click it and choose to create an empty text frame; see Empty frames. Text > Insert Placeholder Text fills the selected frames with sample text, as much as fits. It works on an empty frame you have just drawn too, and you can keep typing after the sample text. Right-click a paragraph frame, or right-click while you type in one, to find the same command.
Editing text
Click text with the Text tool, or double-click it with the Pick tool, to edit it in place. Text > Edit Text (Ctrl+Shift+T) opens a box with the whole text to edit instead; OK puts it back in the drawing, and the characters you did not change keep their formatting.
| Keys | What they do |
|---|---|
| Typing, Ctrl+V | insert at the caret, replacing the selection |
| Ctrl+C, Ctrl+X, Ctrl+V | copy, cut and paste the selected characters; the Edit menu, the toolbar and the right-click menu do the same while you edit. Pasted here, they keep their font, size and colors; other programs get their plain text |
| Backspace, Delete | delete the selection, else the character before or after |
| Enter, Shift+Enter | new paragraph, new line |
| Arrow keys, with Ctrl | move by a character or a word; Shift selects |
| Home, End, with Ctrl | start or end of the line, or of the text |
| Ctrl+A | select all |
| Ctrl+B, Ctrl+I, Ctrl+U | bold, italic, underline |
| Ctrl+L, Ctrl+E, Ctrl+R | align left, center, right |
| Ctrl+J, Ctrl+H, Ctrl+N | full justify, force justify, no alignment |
| Shift+F3 | change case (see Proofing) |
| Double-click | select a word |
A new alignment keeps artistic text in place at the reference point of the X and Y fields of the property bar; in a frame it applies to the paragraphs at the caret.
Text in right-to-left scripts (Arabic, Hebrew) is laid out right to left, also when it is mixed with left-to-right words, and selections shade every selected letter. Keyboards and input methods that send characters (such as those for Tamil and other Indian scripts on Windows) type into text and fields, and Alt codes typed on the keypad give their character once. Letters typed with AltGr (Polish ą ę ł, German @ € { }) type into text and fields, also on Windows. On Android the on-screen keyboard types every script its input methods compose (Chinese, Japanese, Korean, Tamil). Older fonts that set the letters of a script at the places of Latin ones (some Tamil fonts) type as their keyboards expect: Autocorrect does not change the letters typed in them.
All your typing in one editing session is one undo step.
Formatting from the property bar
With the Text tool, or with text selected, the property bar has the font list, the size (type it or pick from the list), bold, italic, underline, the alignment (left, center, right, full justify), bullets and drop cap for paragraph text, Text (Ctrl+T) and Edit Text. The button beside the font size opens the sliders of a variable font's axes (see Variable fonts). While editing, they act on the selected characters; otherwise on the whole selected texts, and only the setting you change: a new font for several texts keeps each one's size, bold and italic. Your choice also becomes the default for the next text.
The font list shows each family in its own font, with the ones you used last at the top. Type to narrow the list. A family with several styles has an arrow that shows them. See Fonts and glyphs.
The Text panel
The Text panel (Ctrl+T) has every text setting, in three sections you can open and close: Character, Paragraph and Frame. The three buttons at the top show the panel from that section on.
Full justification spreads Chinese and Japanese lines to the edge of the frame by adding room between the characters, and paragraph text in those scripts breaks lines by their rules: punctuation such as ,。、 and closing brackets never start a line, and opening brackets never end one. Letters given another color keep the font's kerning with their neighbours.
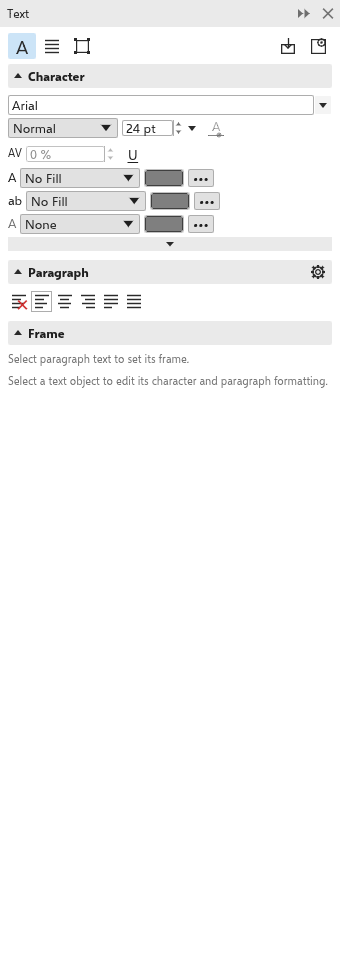
- Character: the font, style and size; range kerning (-50 to 200%) and underline; the fill, background and outline of the characters. More options under the section: character offsets and angle, strikethrough and OpenType features.
- Paragraph: the alignment (none, left, center, right, full justify, and forced justify, which spreads the last line too); the direction, left to right or right to left for Arabic, Hebrew and other right-to-left text (lines start at the right and the indents change sides); line spacing in percent of the character height, points or percent of the font size; left, first-line and right indents; space before and after paragraphs; character and word spacing. The gear opens custom hyphens.
- Frame, for paragraph text: the background color of the frame, the vertical alignment (top, middle, bottom), fit text to frame, columns (1 to 8) and the gap between them, and links to the bullets, drop cap and columns dialog boxes, and hyphenation.
Every change applies to the selected characters while editing, or to the selected texts, and is one undo step. With no text selected, the settings become those of new text. The button at the top right gives new text the settings of the selected text.
Paragraph text frames
Frames show as dashed lines. A frame turns red, with a small tab under its bottom edge, when its text does not fit; the text that does not fit is not drawn, printed or exported. To make it fit:
- drag the frame's handles to enlarge it. The text flows again; the letters keep their size;
- choose Text > Text Frame > Fit Text to Frame to resize the text to fill the frame;
- link the frame to another one, so the text flows on: Link. Unlink breaks the link. With two frames picked, the first flows into the second; an empty frame always takes the text that does not fit in the other one, whichever you picked first. Or click the small tab under the frame's bottom edge, then click another frame (on this page or another one) or click or drag on an empty spot for a new frame: the text flows on into it. You can also drag from the tab and let go over another frame or an empty spot.
- a picked frame also has a small tab over its top edge: click it, then click the frame whose text should flow into this one, or click an empty spot for a new frame that the text starts in. The top tab shows two links when text flows in, and the bottom tab when the text flows on; while you choose, a dashed line runs from the tab to the pointer.
Text > Show Text Frames shows or hides the frames.
Moving and turning characters
With the Shape tool, text shows a node at each character: drag nodes to move characters, and drag the arrows at the corners of the text to change the character, word and line spacing. The character offsets and angle can also be typed in the Text panel. Text > Straighten Text puts characters back in line, and Align to Baseline (Alt+F12) removes their vertical offsets.
Text on a path
- Select a text and a curve or shape.
- Choose Text > Fit Text to Path.
Or click the outline of a path with the Text tool and type. Text on a closed shape stands on its outside, centered on its top; clicked on the bottom of an ellipse, it starts there.
With text on a path selected (also with the Pick tool), the property bar shows the path's fields first, then the usual text fields:
- The orientation of the letters: rotated, vertical skew, horizontal skew or upright.
- The vertical placement: on the baseline, the ascender, the descender, or centred on the path.
- The placement along the path: at its start, centre or end, and on a closed path also Top centre (centred on the highest point, outside and upright) and Bottom centre (centred on the lowest point, inside and reading left to right, as the bottom line of a stamp).
- The distance from the path and the offset along it. A new distance keeps the text centred where it was, so a line at the bottom of a circle stays centred as it moves in or out.
- The two mirror buttons, which put the text on the other side of the path or turn it round, and Straighten Text, which takes it off the path.
Drag the text to slide it along the path, or across the path to move it away from it.
Other text commands
- Text > Insert Special Character: special characters such as Em Space, Non-breaking Space, Optional Hyphen and Column/Frame Break.
- Show Non-Printing Characters shows spaces, tabs and breaks.
- Use Web-safe Text prepares text for web pages.
- Text > Convert switches between artistic and paragraph text.
- Converting text to curves (Object > Convert to Curves) keeps its look without the font.
- Text files can be imported; see Importing files.